Sample screen
Chop a sample into slices
Cut on the grid, at the transients or by hand, then trim, silence and remove slices.
A slice is a piece of the sample between two cuts. Once a sample has slices you can move them, repeat them and give each its own sound. A track can have up to 128 slices.
The idea: a cut is a marker, not an edit
Chopping does not divide the file into separate pieces. It places markers on the sample, and the stretch of audio between two markers is a slice. This has three consequences:
- Nothing is lost. The file is untouched, and removing a marker gives you back the whole stretch.
- Chopping alone changes nothing you hear. Each slice gets a block at its original place, so the sample plays exactly as before. The sound changes when you rearrange the blocks or change a slice's settings.
- You can cut more later. A new cut splits one slice into two, and the pattern follows.
How finely to chop depends on what you want to move. To rearrange whole beats, eighths are enough. To replace single hits, each hit must be its own slice.
The tools
The tools are in the tool row, just above the waveform. Three ways to cut can be mixed freely: on the grid, at the transients and by hand.

1Normalize 2Reverse 3Clear the sample 4Snap to zero crossings 5Slice tool 6Note value and Chop grid 7Sensitivity and Chop transients 8Clear slices. The three keys at the far right zoom the waveform.
Before you chop a loop
Grid cuts are counted in bars, so first make the loop's length right: check Bars in the Playback group and, if the loop does not fill its bars exactly, use Fit sample to N bars. See Make a loop exactly N bars long. For a one-shot or a recording you chop by ear, skip this.
Chop on the grid
- Click the small menu beside Chop grid and choose a note value: from 1/1 to 1/64, or a triplet (T). It starts at 1/16.
- Click Chop grid.
The sample is cut at every step of that value. A one-bar loop chopped at 1/16 gets 16 equal slices; a two-bar loop at 1/8 gets 16 too. If the sample does not end on a step, the last slice is shorter.
Use the grid for loops that are tight on the beat, and when you want to rearrange the loop in steps: every slice is then the same length and can take the place of any other without leaving a gap or an overlap.
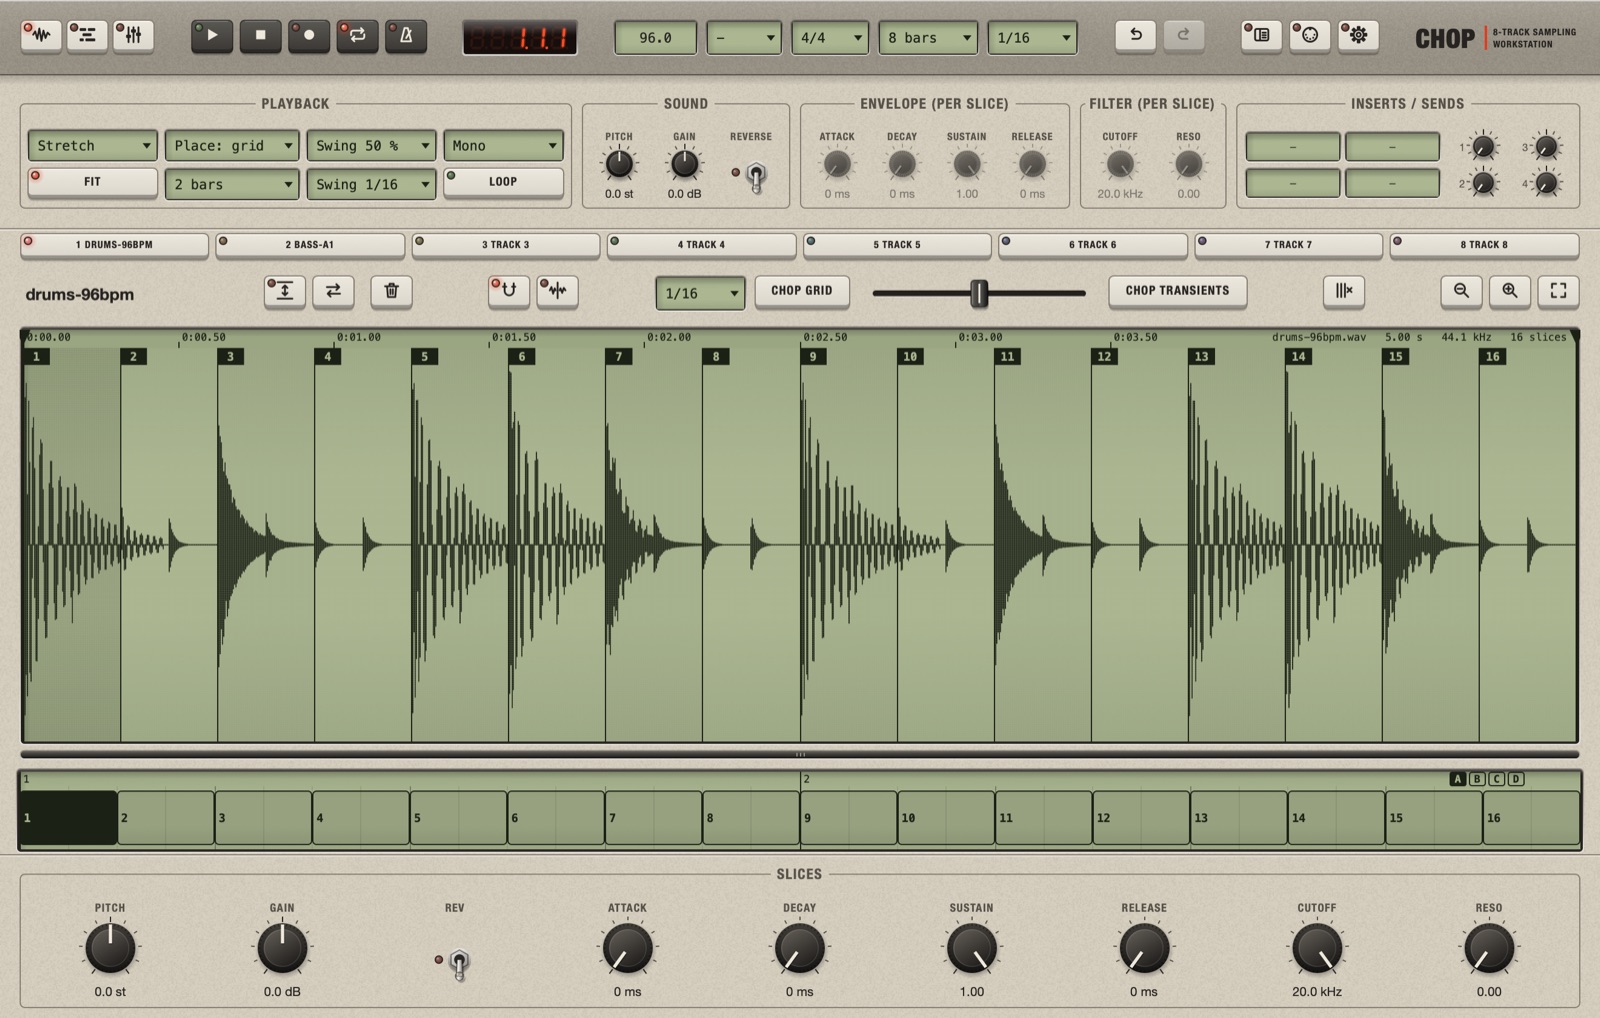
The steps are counted in the sample's bars, from its start. If Chop has the wrong length for the loop, the cuts fall between the hits: see Make a loop exactly N bars long.
Chop at the transients
- Click Chop transients. Chop cuts where the hits start.
- Too few or too many slices? Press Cmd+Z, move the slider to the left of the key (to the right: more cuts), and click Chop transients again.
Chop looks for the moments where the level jumps up, which is where a drum is hit or a note starts. Use transients for loops with swing or loose playing, and for anything that is not on a grid: each slice then holds one whole hit, however long it is. The slices have different lengths, so when you swap two of them a short one leaves a gap and a long one covers its neighbour; with Timing on Beats this is exactly what you want.
Cut by hand
- Double-click the waveform where you want a cut.
- Or right-click there and choose Add slice here.
- Or turn on the Slice tool (the key with the cut waveform): now every single click cuts. Turn it off when you are done, or you will keep cutting.
With Placement on Place: grid (Playback group), the Slice tool cuts on the toolbar's Grid. On Place: free it cuts exactly where you click.
Add cuts to a sample that has slices
You can chop again at any time. Chop grid and Chop transients then cut only what is left to cut: each new cut splits the slice it falls in, and your pattern keeps its blocks (a block of a split slice becomes two). Slices you silenced stay silent.
To start from nothing, click Clear slices first, then chop.
Avoid clicks at the cuts
Leave Snap to zero crossings (the magnet) on. Every cut, automatic or by hand, then moves to the nearest point where the wave crosses zero. Chop also gives each slice a very short fade at both ends, so slices that follow each other play without a gap or a click.
Move the start or the end of a slice
Drag the start or the end of a slice in the waveform. The sound stays where it is; only the edge moves, like the edge of a clip in a video editor.
- Only that piece changes. The slice beside it keeps its own edges, so a longer piece shares a little audio with its neighbour, and a shorter one leaves a gap.
- Its copies do not change. If the same slice plays in other places (copies, other variations), the piece you trim becomes a slice of its own, with a new number.
- On Place: grid the edge snaps to the grid while you drag; on Place: free it follows the mouse. With Snap on, it lands on a zero crossing when you let go.
- Where two edges touch, you take the edge of the selected piece. Click the piece first, then drag its edge.
Silence a slice
| You want to | Do this |
|---|---|
| Silence it where you clicked | Click it in the waveform and press Delete. That place becomes silent (hatched); if the slice also plays elsewhere, those copies stay. |
| Silence every copy of it in this pattern | Right-click it > Silence slice (all copies). |
Both act on the pattern you see; the other variations keep their blocks. The slice still exists, with its number and its cut. To bring it back, Cmd+Z, or add it again in the lane (Build a pattern).
Silencing, muting, deleting and removing are compared in Mute, delete, silence, remove: the differences.
Remove a cut
- One cut: right-click the slice > Remove slice. Its audio joins the slice beside it.
- All cuts: click Clear slices in the tool row. The sample is whole again.
Listen to the slices
Click a slice and press Space to hear it alone; Left and Right go to the previous and the next. All the ways to listen are in Play and listen.
What to do next
- Reorder the slices: Build a pattern.
- Change how a slice sounds: Shape the sound.
- Export each slice as a file: Export the slices of a track.
A shaded waveform in an older project
Projects made with an early version of Chop can have a region: only a part of the sample plays, and the rest of the waveform is shaded. Right-click the waveform > Reset region (the whole sample) to use the whole file again. New projects always use the whole sample.