Sample screen
Shape the sound
Pitch, gain, reverse, envelope and filter, for the whole track, for a slice or for a single block.
The idea: the same controls at three levels
Chop has few sound controls: pitch, gain, reverse, an envelope and a filter. What makes them powerful is that they exist at three levels, one inside the other, and each level reaches a different amount of your music.
- The track level sets the starting point for everything the track plays.
- The slice level changes one piece of the sample. Since a slice can play in many places, a change here is heard in every one of them.
- The block level changes one single place in the pattern, and nothing else.
So the question to ask before turning a knob is: how far should this change reach? All the snares, or only this one?
Three levels
| Level | Where | It changes | Use it to |
|---|---|---|---|
| Track | Top panel: Sound, Envelope, Filter | The whole track. | Tune the sample, set its level, play it all backwards. |
| Slice | Bottom panel: Slices | One slice, in every place it plays. | Make the snare shorter, the kick darker. |
| Block | Bottom panel: Selected Slices | One place in the pattern. | Pitch one copy up, reverse a single hit. |
How the levels combine:
- Pitch, gain and reverse add up. The slice's pitch is added to the track's, and the block's to both.
- Envelope and filter are not added between track and slice. Once a track has slices, each slice has its own envelope and filter, and the track's are not used any more. The block's values are then added to its slice's.
Example
The track's Pitch is -2 (the whole loop tuned down two semitones). The snare slice has Pitch +3. One of the snare's three blocks has Pitch +12 in Selected Slices. Two of the snares play at -2 + 3 = +1 semitone. The third plays at -2 + 3 + 12 = +13.
Later you change the snare slice to +5: all three follow, to +3, +3 and +15. The block keeps its difference of an octave.
This is the reason the block's knobs are offsets, starting at 0, rather than values of their own: a block always remains "its slice, plus something", so work on the slice is never lost on the copies.
Every knob works while the track plays, and its changes are smooth: nothing clicks.
Change the whole track
In the Sound group of the top panel:
- Pitch: 24 semitones down to 24 up.
- Gain: -24 to +24 dB, before the effects and the mixer. Use it to match samples of different loudness; set the track's level in the song with the Mixer's fader.
- Reverse (the metal switch): lever up, every slice plays backwards, in its own place.
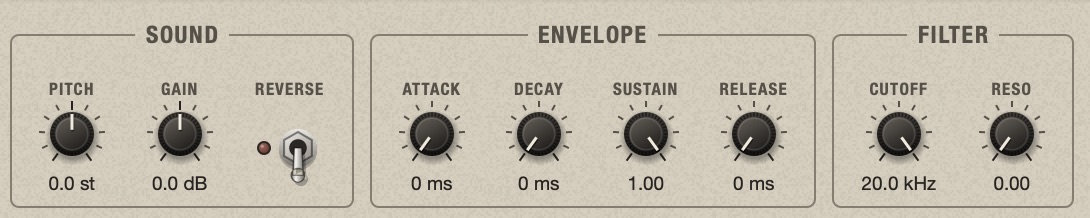
The Envelope and Filter groups beside it shape a track that has no slices yet. Once you chop, each slice gets its own envelope and filter, starting from these values; the track's knobs are then dimmed and their titles read (per slice).
Change one slice
- Click the slice in the waveform, or one of its blocks.
- Turn the knobs of the Slices group in the bottom panel.
| Knob | What it does | Range |
|---|---|---|
| Pitch | Tunes the slice. | ±24 semitones |
| Gain | Makes it louder or quieter. | ±24 dB |
| Rev | Plays it backwards. | switch |
| Attack | The time it takes to fade in. 0: it starts at once. | 0 to 2000 ms |
| Decay | The time it takes to fall from full level to the Sustain level. | 0 to 2000 ms |
| Sustain | The level it holds after the decay. 1.00: full level, the slice plays as it is. | 0 to 1 |
| Release | The time it takes to fade out at the end. | 0 to 2000 ms |
| Cutoff | A low-pass filter: turn it down to remove the highs. Fully up, it does nothing. | 20 Hz to 20 kHz |
| Reso | Emphasis at the cutoff frequency. | 0 to 1 |
The change reaches the slice wherever it plays: every copy, every variation.
How the envelope shapes a slice
The envelope is the volume of a slice over the time it plays. Without it (Attack, Decay and Release at 0, Sustain at 1) a slice starts at full level, stays there and stops at its end. The four knobs change that shape:
- Attack is how long the slice takes to reach full level. At 0 it starts at once, with its full hit. A few milliseconds soften a click; a few hundred make a swell and hide the hit.
- Decay is how long it then takes to fall to the Sustain level.
- Sustain is that level: a volume, from 0 to 1, not a time. At 1 there is nothing to fall to, and Decay does nothing.
- Release is a fade-out over the last part of the slice. It ends exactly where the slice ends: it does not make the slice ring longer, it makes its ending smooth.
Decay and Sustain work as a pair. To make a sound shorter, lower Sustain and choose with Decay how fast it gets there.
Recipes
- Shorter, tighter hit: Sustain 0, Decay 80 to 200 ms. The slice fades to silence in that time, however long it is.
- Remove a click at the start: Attack 2 to 5 ms.
- Swell (no hit): Attack 200 ms or more.
- Smooth ending on a chopped pad or voice: Release 50 to 200 ms.
- Hit with a quiet tail: Sustain 0.3, Decay 100 ms.
How the filter changes a slice
The filter is a low-pass: it lets the low frequencies through and removes the highs above its Cutoff. Fully up (20 kHz) it removes nothing. Turn it down and the sound gets darker and more muffled, like music heard through a wall.
Reso boosts the frequencies right at the cutoff. A little makes the filter more noticeable; a lot gives a ringing, whistling tone at the cutoff frequency.
Use it per slice to tame one bright hi-hat, to make a kick rounder, or on a block to make one hit of a pattern duller than the others.

Change several slices together
Select them with Cmd+click or Shift+click, then turn a knob of Slices: they all take the same value, in one undo step.
Change one block only
- Click the block in the lane (or the piece in the waveform).
- Turn the knobs of the Selected Slices group, beside Slices.
These values are added to the slice's. At 0 the block sounds exactly like its slice, so a later change to the slice still reaches it.
The knobs look the same as those of the Slices group, but they read differently: 0 st, 0 dB and 0 ms mean "no difference", and they can go negative. A Decay of -50 ms makes this one hit 50 ms shorter than its slice says.
- Pitch and Gain are offsets in semitones and dB; Attack, Decay and Release in milliseconds; Cutoff in octaves; Rev turns the slice's direction round.
- The total stays inside the slice's ranges: a block is never louder than its slice's Gain knob at the top.
- A block with its own values shows its pitch offset (for example
+5) or a star. - Double-click a knob to put it back to 0. Right-click the block > Reset block parameters (as the slice) clears them all.
- With several blocks selected, they all take the value.
Block settings belong to the pattern, like the block's position: each variation has its own, and they cannot be mapped to MIDI.

Play something backwards
| You want | Use |
|---|---|
| The whole sample turned round, last piece first | The Reverse key in the tool row. |
| Every slice backwards, each in its place | The Reverse switch in the Sound group. |
| One slice backwards, in all its copies | Rev in the Slices group. |
| One hit backwards, once | Rev in the Selected Slices group. |
The first one is different in kind from the other three. The tool row's Reverse turns the sample round, so the last piece comes first and your pattern is mirrored with it. The three switches leave every piece in its place and only change the direction each one plays in.
The three switches turn each other round: a reversed slice in a reversed track plays forwards. Reversed pieces are drawn mirrored in the waveform and marked REV.
Copy a slice's sound to another
- Select the slice and press Cmd+C (or right-click > Copy slice parameters).
- Select another slice, on this or another track, and press Cmd+V (Paste slice parameters).
To give them to every slice of the track, press Cmd+Shift+V (Paste slice parameters to all).
Pitch, gain, reverse, envelope and filter are copied. The slice's place, length and blocks are not. What you copied is kept until you quit, not saved with the project.
Pitch and length
On a tape or a record, pitch and speed are the same thing: higher means faster and shorter. A sampler works that way too unless it time-stretches. Chop can do both, and the track's Timing decides:
- With Stretch, pitch never changes the length. The groove stays as it is.
- With Varispeed, Beats, Original, or Fit off, pitch works as on a classic sampler: pitched up, a slice plays faster and ends early; pitched down, it plays slower and lasts longer (in Mono, the next slice cuts it).
The waveform shows each slice at the length it plays. See Choose how the sample follows the tempo.
Gain or the Mixer's fader?
Both make a track louder or quieter, at different points. Gain (track, slice, block) acts on the sound before the effects: it sets how hard a hit drives a compressor or a distortion, and it balances the slices against each other. The fader in the Mixer acts after the effects: it sets how loud the finished track is in the song.
So: use Gain to even out the pieces inside a track (a snare that is too loud among the other slices), and the fader to balance the tracks.
Put a knob back, or on a MIDI controller
- Double-click a knob: back to its default.
- Right-click a knob of the track or of the Slices group: MIDI Learn, and MIDI Learn (selected slice) to make one knob follow whichever slice is selected. See Control Chop from a MIDI controller.